
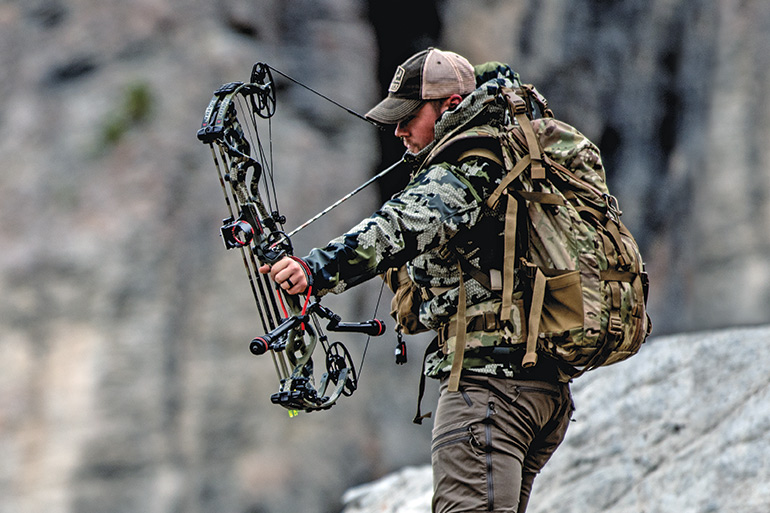
To make a bow stabilizer, start by selecting a suitable material and shaping it into the desired form. Then, attach the stabilizer to the bow and adjust the positioning and weight distribution as needed.
Additionally, ensure that the stabilizer is securely fastened to provide optimal stability and balance during archery practice or competition.
Credit: gunnewsdaily.com
Enhancing Accuracy And Precision
Reducing Bow Torque For Better Aim
- When it comes to improving accuracy and precision in archery, minimizing bow torque is crucial.
- Bow torque refers to the twisting motion that occurs upon releasing the bowstring, which can adversely affect your aim.
- Here are some effective methods to reduce bow torque and enhance your overall shooting performance:
- Increase grip pressure: Apply firm, consistent pressure with your bow hand to prevent the bow from rotating upon release.
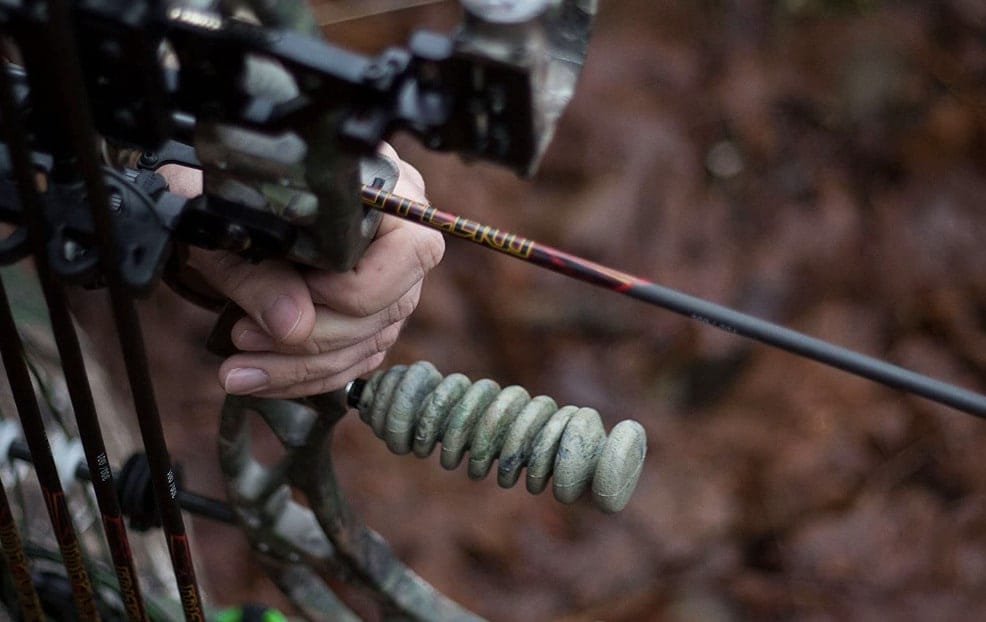
- Use a stabilizer: Attach a bow stabilizer to your bow to counterbalance torque and minimize vibrations.
- Opt for a longer stabilizer: A longer stabilizer provides more counterbalance and stability, reducing the chances of bow torque.
- Utilize an offset stabilizer weight: Placing a heavier weight on one side of the stabilizer can offset the natural tendency of the bow to twist.
- Proper grip technique: Ensuring a proper hand placement on the bow grip can help neutralize torque, leading to better aim.
- Engage core muscles: Strengthening your core muscles will provide better control over your entire shooting process, reducing torque.
Improving Balance And Stability During Shooting
- Achieving balance and stability during shooting is essential for consistent accuracy. Here are some techniques to enhance your balance and stability:
- Stance and posture: Start by adopting a stable and balanced stance. Keep your feet shoulder-width apart, with your body weight evenly distributed.
- Engage your back muscles: Activating your back muscles will help maintain stability and prevent unnecessary movements during the shot.
- Use a waist sling: A waist sling can aid in balancing the bow and stabilizing your shooting position.
- Incorporate a wrist sling: Attaching a wrist sling will ensure that you do not grip the bow too tightly, allowing for better stability.
- Focus on your breathing: Maintain calm and controlled breathing, as it can help stabilize your body and reduce any unintentional movements.
- Train your muscles for stability: Incorporate exercises that target your core, back, and shoulder muscles, as they play a vital role in maintaining balance and stability.
By implementing these techniques, you can significantly improve accuracy and precision in archery. Remember to practice consistently and adjust the methods according to your individual needs and preferences. Happy shooting!
Types Of Bow Stabilizers
Bow stabilizers are crucial accessories for archers looking to improve their accuracy and performance. These devices effectively dampen vibrations and steady the bow during the release, resulting in enhanced stability and precise shots. When it comes to bow stabilizers, there are two main categories to consider: traditional and modern.
Each type offers unique features and benefits suited to different shooting preferences. In this section, we will explore the characteristics of each type and discuss key considerations for selecting the right stabilizer for your bow.
Traditional Bow Stabilizers
- Materials used: Traditional bow stabilizers are commonly crafted from durable materials such as wood, carbon, or aluminum. These materials ensure longevity and provide satisfactory vibration dampening properties.
- Length and weight considerations: The length and weight of a traditional bow stabilizer play a crucial role in balancing the bow during the shot. A longer stabilizer can provide greater stability and reduction in bow torque, while a heavier stabilizer can further enhance stability by absorbing excess energy and vibrations.
- Installation tips and techniques: To install a traditional bow stabilizer, simply attach it to the front mounting hole, located beneath the grip of the bow. Ensure a secure fit to prevent any movement during shooting. Experiment with different lengths and weights to find the optimal combination for your shooting style.
Modern Bow Stabilizers
- Introduction to advanced technologies: Modern bow stabilizers utilize advanced technologies to provide optimal stabilization and vibration reduction. These can include features such as adjustable counterweights, dampening materials, and integrated shock absorbers.
- Features and benefits: Modern bow stabilizers offer several benefits, including improved balance, reduced hand shock, and enhanced accuracy. Adjustable counterweights enable archers to fine-tune the stabilizer’s balance point, maximizing its effectiveness. Dampening materials such as rubber or silicone reduce vibrations, resulting in a smoother and more controlled shot.
- Selecting the right stabilizer for your bow: When choosing a modern bow stabilizer, consider factors such as length, weight, adjustable features, and personal shooting preferences. Experiment with different models to find the one that complements your shooting style and helps you achieve the desired level of stability and accuracy.
Remember, bow stabilizers are versatile tools that can greatly enhance your archery experience. Whether you prefer the traditional or modern approach, finding the right stabilizer for your bow can significantly improve your shooting performance and overall enjoyment.
Gathering The Materials
Essential Equipment And Tools:
To make a bow stabilizer, you will need the following equipment and tools:
- Aluminum rod: A sturdy and lightweight material that forms the main body of the stabilizer.
- End caps: These caps are used to secure and provide a clean finish to the stabilizer.
- Weight system: The weight system helps to adjust the balance and stability of the bow.
- Rubber dampeners: These dampeners absorb vibrations, reducing noise and improving the overall shooting experience.
- Drill: Use a drill to create holes in the aluminum rod for attaching the weight system and rubber dampeners.
- Screws: These help to secure the weight system and rubber dampeners onto the aluminum rod.
- Allen wrench: An essential tool for tightening the screws and making adjustments as needed.
Choosing The Right Components:
When making a bow stabilizer, it’s important to choose the right components. Here are some factors to consider:
- Length: The length of the stabilizer depends on personal preference and the type of shooting you plan to do. Longer stabilizers generally provide more stability but can be less maneuverable.
- Material: Opt for a lightweight and durable material like aluminum or carbon fiber. These materials offer both strength and flexibility.
- Weight system: Consider the weight system options available for the stabilizer. Some weight systems allow for adjustable weights, while others have fixed weights. Select a weight system that suits your shooting style.
- Dampening properties: Look for rubber dampeners that have good vibration-absorbing properties. High-quality dampeners will help reduce noise and vibration during shooting.
Remember to choose components that work well together and complement your bow setup. The right combination of length, material, weight system, and dampeners can greatly enhance your shooting experience.
Now that you have gathered the necessary materials and understand the importance of choosing the right components, you’re ready to move on to the next stage of making your own bow stabilizer. Stay tuned for the next section, where we will guide you through the assembly process.
Preparing The Bow
Before making a bow stabilizer, there are a few important steps to take in order to properly prepare the bow. In this section, we will discuss two key aspects of bow preparation: removing any existing stabilizer and adjusting the bow’s balance.
Removing Any Existing Stabilizer
It is crucial to start with a clean slate when making a bow stabilizer. Here’s how you can remove any existing stabilizer:
- Identify the stabilizer: Look for the current stabilizer attached to your bow. It is usually located just below the grip or on the front end of the bow.
- Unscrew or detach the stabilizer: Use the appropriate tool, like an allen wrench or screwdriver, to loosen and remove the stabilizer from the bow. Be sure to keep track of any screws or bolts that are removed.
- Clean the attachment area: Once the stabilizer is removed, take a moment to clean the attachment area. Use a soft cloth or mild cleaning solution to remove any dirt, debris, or adhesive residue that may be present.
By removing any existing stabilizer and preparing the attachment area, you will have a clean and ready surface to work with when installing your new bow stabilizer.
Adjusting The Bow’S Balance
Achieving the proper balance of your bow is essential for optimal performance. Follow these steps to adjust the bow’s balance:
- Determine the bow’s natural balance point: Gently hold your bow with an open hand and allow it to settle into a balanced position. Take note of where the bow naturally rests in your hand without any additional support.
- Assess the balance: Once you have identified the bow’s natural balance point, evaluate its stability. Ideally, the bow should balance evenly in your hand without tipping forward or backward.
- Add or remove weight: If the bow is not well-balanced, you can make adjustments by adding or removing weight. Attach small weights to the riser or limb pockets, or use a bow balance system specifically designed for this purpose.
- Test the balance: After making adjustments, it is important to test the balance again. Hold the bow in the same manner as before and check if it now rests comfortably and evenly in your hand.
By adjusting the bow’s balance, you can enhance stability, accuracy, and overall shooting experience.
Remember, proper preparation of the bow is crucial before creating a bow stabilizer. Remove any existing stabilizer and ensure the bow is well-balanced for optimal results.
Designing The Stabilizer
Designing a bow stabilizer is an important aspect for archers who want to improve their accuracy and precision. The right stabilizer can greatly enhance your shooting experience by reducing bow torque, absorbing vibrations, and stabilizing the bow during release. In this section, we will explore the key factors to consider when designing a bow stabilizer.
Determining The Length And Weight:
To ensure optimal performance, it is crucial to determine the appropriate length and weight for your bow stabilizer. Consider the following points:
- Bow length: The length of the stabilizer should ideally match the length of your bow. This helps in maintaining balance and stability during the shooting process.
- Stabilizer weight: The weight of the stabilizer depends on personal preferences and shooting style. Here are a few considerations:
- Lightweight stabilizers: Suitable for archers who prefer quicker and more maneuverable shots. These stabilizers are less effective in reducing bow torque but provide better flexibility.
- Heavy stabilizers: Ideal for archers seeking maximum stability and vibration damping. They effectively counterbalance the weight of the bow, reducing hand movements and enhancing accuracy.
Choosing The Stabilizer Type (Static Or Dynamic):
When designing a bow stabilizer, you can opt for either a static or dynamic type. Let’s explore their differences:
- Static stabilizer:
- Provides a fixed weight and length throughout the shot.
- Offers consistent balance and stability, reducing hand vibrations.
- Typically recommended for beginners or archers who prefer a straightforward approach.
- Dynamic stabilizer:
- Features adjustable weight and/or length to fine-tune the balance of the bow.
- Allows customization based on individual shooting style and environmental conditions.
- More commonly used by experienced archers who require precise adjustments for optimal performance.
Consider your shooting style, experience level, and personal preferences when selecting between a static and dynamic stabilizer.
By considering the length, weight, and type of stabilizer, you can design a bow stabilizer that meets your specific needs. Remember, the right stabilizer can significantly enhance your shooting experience and improve your overall accuracy and precision. Experimenting with different configurations can help you find the perfect combination that optimizes your bow’s performance.
Building The Stabilizer
When it comes to archery, having a bow stabilizer can greatly enhance your shooting experience. A stabilizer helps in reducing bow torque, absorbs vibrations, and improves overall balance. If you’re a diy enthusiast, you can easily make a bow stabilizer at home.
Here’s a step-by-step guide on building your own stabilizer:
Step 1: Cutting The Stabilizer Shaft
To begin with, you’ll need a shaft to serve as the base of your stabilizer. Follow these steps to cut the stabilizer shaft to the desired length:
- Measure and mark the desired length for your stabilizer shaft.
- Use a saw or pipe cutter to cut the shaft at the marked point.
- Smooth out any rough edges with sandpaper.
Step 2: Adding Weights Or Dampeners
Adding weights or dampeners to the stabilizer shaft is crucial for achieving optimal stability. Here’s how you can do it:
- Choose the type of weight or dampener you want to add to your stabilizer. Lead weights or rubber dampeners are commonly used options.
- Securely attach the weights or dampeners to the stabilizer shaft using strong adhesive or screws.
- Consider adding multiple weights or dampeners at different points along the shaft for better balance and vibration reduction.
Step 3: Attaching The Stabilizer To The Bow
Once you’ve prepared the stabilizer shaft, it’s time to attach it to your bow. Follow these steps:
- Locate the stabilizer mounting hole on your bow’s riser. This hole is usually located near the grip.
- Insert the end of the stabilizer shaft into the mounting hole, ensuring a snug fit.
- Use a stabilizer bolt or screw to secure the stabilizer in place. Make sure it is tightened firmly, but avoid overtightening to prevent damage to the mounting hole or stabilizer shaft.
Congratulations! You have successfully built and attached a stabilizer to your bow. Now you can enjoy improved stability, reduced vibrations, and better accuracy in your archery sessions. Happy shooting!
Remember, a well-made stabilizer can significantly enhance your archery experience. By following these simple steps, you can create a customized stabilizer that suits your specific needs and preferences. So, unleash your creativity, grab your tools, and get ready to improve your shooting skills with a diy bow stabilizer!
Testing And Fine-Tuning
Evaluating The Stabilizer’S Performance:
Once you have assembled your diy bow stabilizer, it is crucial to evaluate its performance to ensure optimal results. Testing and fine-tuning the stabilizer will enable you to make any necessary adjustments for better aim. Here are some key points to consider during this process:
- Stability: Check how effectively the stabilizer minimizes bow movement and vibration. Evaluate if it provides the desired level of stability to improve your shooting accuracy.
- Balance: Assess whether the stabilizer evenly distributes weight across the bow, allowing for better balance and control. A well-balanced stabilizer can contribute to a more consistent and steady shot.
- Damping: Observe the extent to which the stabilizer reduces noise and vibration upon releasing an arrow. A good stabilizer should effectively dampen these factors, minimizing their impact on your aim.
- Shot recovery: Pay attention to how quickly your bow returns to its original position after each shot. A successful stabilizer will facilitate faster shot recovery, allowing you to take subsequent shots more efficiently.
Now that you know what to look for when evaluating your bow stabilizer’s performance, it’s time to make any necessary adjustments for optimal aim.
Making Adjustments For Optimal Aim:
After testing your diy bow stabilizer and identifying areas for improvement, fine-tuning becomes the next step. By making these adjustments, you can enhance your aim and overall shooting experience. Consider the following techniques when refining your stabilizer:
- Weight configuration: Experiment with different weights and placements on your stabilizer to find the optimal balance for your specific bow setup. Adjusting the weight distribution can drastically impact stability and control.
- Stabilizer length: If you feel like your bow is too top-heavy or lacks the necessary stability, try altering the length of your stabilizer. Shortening or lengthening it can influence the overall feel and balance of your bow.
- Adding dampeners: Incorporate additional vibration dampening materials or accessories, such as rubber dampeners or limb savers, to further reduce noise and vibration. These can provide an extra layer of stability and comfort.
- Fine-tuning accessories: Utilize other accessories, such as a sight, rest, or release aid, to augment your aiming capabilities. Adjusting these components in coordination with your bow stabilizer can lead to improved accuracy.
- Regular testing: Continue testing your bow after each adjustment to assess its impact on your shooting performance. Be patient and take the time to find the optimal settings that work best for you.
Remember, fine-tuning your stabilizer is an ongoing process. It may require multiple iterations to achieve the desired aim. Always dedicate time to test and evaluate each adjustment you make to see how it influences your shooting precision.
Proper Adjustments And Maintenance
Making proper adjustments and regularly maintaining your bow stabilizer is crucial for optimal performance and longevity. Here are some key steps to follow:
Fine-Tuning The Stabilizer’S Length And Weight:
- Adjusting the length: Start by experimenting with different lengths to find the right balance for your shooting style. Shorter stabilizers offer quicker maneuverability, while longer ones provide greater stability. Remember to consider the bow’s overall weight and your personal preference.
- Determining the optimal weight: It’s essential to find the perfect weight that suits your needs. Begin by attaching the stabilizer without any additional weights and test its balance. Gradually add weights to achieve the desired stabilization without compromising your shot control.
Regularly Checking For Any Damage Or Wear:
- Visual inspection: Inspect your bow stabilizer regularly, paying attention to any cracks, dents, or loose components. If you notice any damage, it’s important to address it promptly to prevent further deterioration.
- Tightening loose parts: Over time, vibrations and impacts can cause nuts, bolts, or screws to become loose. Regularly check and tighten every part of your stabilizer, ensuring it is securely attached to the bow.
- Lubrication: Apply a small amount of lubricant to movable parts, such as adjustable brackets or dampeners, to ensure smooth operation. This will also help prevent rust and ensure longevity.
- Consider replacing worn-out components: If you consistently find signs of wear or damage that cannot be repaired, it may be time to replace certain parts. This includes worn-out dampeners or end caps that could affect the stabilizer’s effectiveness.
By following these proper adjustment and maintenance tips, you can ensure that your bow stabilizer remains in top condition, enhancing your shooting experience and extending its lifespan. Always prioritize safety and consult the manufacturer’s guidelines for specific maintenance instructions.
Shooting Techniques With A Bow Stabilizer
When it comes to improving your shooting accuracy, utilizing a bow stabilizer can make a significant difference. By making grip and posture adjustments and understanding the benefits of a stabilizer, you can enhance your overall shooting performance. Let’s dive into some techniques that can help you achieve better aim with a bow stabilizer:
Grip And Posture Adjustments
- Proper grip: Hold the bow handle with a relaxed hand grip, ensuring that your fingers are wrapped around the handle firmly but not too tight. Find a grip that feels comfortable and allows you to maintain control of the bow.
- Consistent hand placement: Ensure that your hand placement on the bow grip remains consistent for every shot. This helps in developing muscle memory and consistent aim.
- Balanced posture: Maintain a balanced stance with your feet shoulder-width apart and your body facing the target. Keep your back straight and shoulders relaxed, allowing for better stability during the shot.
Utilizing The Stabilizer’S Benefits For Improved Aim
- Dampening vibrations: A bow stabilizer helps in reducing vibrations caused by the shot, resulting in a more stable aim. This is particularly helpful when shooting at longer distances or in windy conditions.
- Enhancing balance: The additional weight provided by the stabilizer helps in balancing the bow during the shot, minimizing unnecessary movements and improving accuracy.
- Aiming consistency: The stabilizer can assist in achieving consistent aim by providing a reference point. By incorporating a sight or pin system on the stabilizer, you can aim more precisely shot after shot.
Remember, practice is key in mastering these shooting techniques with a bow stabilizer. Regularly shooting with the stabilizer and focusing on grip, posture adjustments, and utilizing its benefits will contribute to your overall improvement in accuracy. Keep refining your skills, and enjoy the rewarding experience of shooting with a bow stabilizer.
Troubleshooting Common Issues
Addressing Bow Torque
When it comes to bow torque, it can greatly affect the accuracy of your shots. Here are some troubleshooting tips to help you address this common issue:
- Proper grip: Ensure that you have a consistent and proper grip on your bow. Keep your hand relaxed and avoid gripping too tightly. This will help minimize torque.
- Hand placement: Position your hand in a way that allows it to be directly in line with the bow’s grip. Make sure your thumb is placed behind the grip, while your fingers wrap around it.
- Wrist positioning: Maintain a neutral wrist position, avoiding excessive bending or twisting. This will help prevent torque from transferring to the bow.
- Bow balance: Check if your bow is properly balanced. Uneven weight distribution can contribute to torque. Make adjustments to achieve a more balanced setup.
Dealing With Excess Vibration Or Noise
Excess vibration and noise can be not only distracting but also indicate underlying issues. Here are a few troubleshooting strategies to mitigate these problems:
- Bowstrings: Ensure that your bowstrings are properly installed and well-maintained. Inspect them for wear and tear, making any necessary replacements. Properly align and secure the bowstrings to minimize vibration.
- Limb pockets: Tighten the limb pockets of your bow to reduce vibration. Loose limb pockets can contribute to excess noise and vibration during the shot.
- Dampeners: Consider using limb dampeners or string silencers. These accessories can help absorb and reduce vibration and noise. Installing them in strategic areas can bring the desired effect.
- Arrows: Check the alignment of your arrows. Misaligned arrows can cause increased vibration and noise. Ensure the arrow rest and nocking point are properly positioned.
Remember, these troubleshooting tips can help you address common issues with bow stabilizers. By implementing these techniques, you can improve your shooting experience and enhance your accuracy. Happy shooting!
Frequently Asked Questions For How To Make A Bow Stabilizer?
How Do You Make A Bow Stabilizer?
To make a bow stabilizer, you will need a stabilizer rod, weights, and an allen wrench. Attach the stabilizer rod to the bow’s front stabilizer mount using the allen wrench. Add weights to the stabilizer rod to balance the bow and reduce vibrations.
Why Do You Need A Bow Stabilizer?
A bow stabilizer helps to improve accuracy and stability while shooting your bow. It reduces vibrations and torque, resulting in smoother shots and tighter groups. A stabilizer also helps to balance your bow, making it easier to hold steady and aim with precision.
What Is The Purpose Of A Bow Stabilizer?
The main purpose of a bow stabilizer is to reduce vibrations and improve stability during shooting. It helps to minimize hand torque and bow movement, resulting in more accurate and consistent shots. Stabilizers also help to balance the bow and make it more comfortable to hold for extended periods.
Conclusion
After reading this comprehensive guide on how to make a bow stabilizer, you now have all the knowledge you need to create your own custom stabilizer. By choosing the right materials and dimensions, you can improve your accuracy, balance, and overall shooting experience.
It’s important to remember that a bow stabilizer is not a one-size-fits-all solution, so it may take some trial and error to find the perfect stabilizer for your specific needs. The key is to experiment and make adjustments until you achieve the desired results.
Additionally, don’t hesitate to seek advice from experienced archers and professionals. With patience and practice, you’ll be able to craft the perfect bow stabilizer that enhances your archery skills and gives you a competitive edge. So, gear up and get ready to take your archery game to the next level!

General Manager & Auditorial Head.
Killian Jake is a World Sports Traveler and hobbyist sports lover. By exploring different sorts of playing modules like indoor, outdoor, and many more. As for professionalism and writing, it’s helpful to give you the right suggestions on different games and sports.
")
")

