
Archery is a passionate sport or sometimes refers to spending time to achieve the desired skill that can be for hunting, game, or competitions. However the reason nobody denies how pleasurable archery shooting is. You may see younger to older all sorts of people who more conveniently want to touch with the skill are love archery.
But before starting, you must need archery equipment, Right? Then the second thing is to practice. When you try to become skilled, the most important thing is to need an archery target. So here we’ll talk about different types of archery target that makes the archery practice easier and comfortable.
We’ll also cover the terms how to make an archery target whether at home, forest, or anything else and how you can make an archery target from household fellow products, cheaply, free, and at a low cost.
How to build an archery target?
You can use several types of archery target using your thoughts and ideas. By the way, here we’ll show you different archery target making ideas which will help the situation when you start making one.
Before we start the discussion, You know, everything requires expense. So the archery making procedure is divided into 4 Different under the category. Let’s talk about the category.
Category-1: Regular archery target.
Category-2: Cheap archery target.
Category-3: Without investment archery targets.
Category-4: Pricey archery target.
The above category is the highlighted preference of different archery making procedures. Every portion is suggested by how to make and target archery, every step, instrument, and many more. Stay aside up to the mark and let’s make different archery targets.
Category-1 : Cheap archery target
From this category of an archery target, You can make a simple one from the start and necessary materials are actually inside your house or can be manageable. However, you can make from these two type-
Type-1.1: PlyWood Box Target.
The plywood box is pretty hard to make, though if you want to try, you will succeed. Plywood wood is a material of several thin layers glued with each other and made from those sliced elements. The dissected slices are joined with others with the help of binding resin and make the fiber connection beside two single slices.
There are several types of plywood available. These are known as A, B, C, or D grade plywood. But for making a practical archery target, you can choose B, C, or D grade plywood. A Grade plywoods are used for different furniture work.
When you use plywood, you must need some essential tools for working. These tools will help you to complete the archery making the procedure smooth and easy. Without these elements, you may face an unusual structure or something else that you don’t expect.
Is plywood a good option?
Yes, why not? If you want to make the box with good quality wood, you must need extra money for it. But in general no one wants to spend money on making an archery target. So, for this reason, plywood can be a good option. You can make it lower in price and durable also for next time use.
Instruments you need?
- Wood glue
- Cutting saw (For plywood preparation)
- Table saw (For plywood preparation )
- Square carpet
- Plywood
- Nails / Nail gun (In case)
- Hammer
How to make PlyWood Box Archery Target at home?
Advantage:
- Usable for a long time. When the carpet completely loses its flexibility then change the carpet.
- Time investment. After making it first, you don’t need to worry about repairing or something like that.
- Customization possibility. ( You can increase the size )
Disadvantage:
- The initial investment is needed.
- Tools needed. (Especially for making plywood)
- Possibility of loosening
How to use the plywood box archery target?
It’s simple to use. After making the targets, place them in a definite place. The backside should be clean and clear. And take your position. If you use a professional or semi-professional archery bow you can select the definite distance but for general practice, the distance can’t be fixed.
#2 Top casual Terms.
Durable:
As we know how hard the plywood box is. So you don’t need to worry about the box. Just try to follow up the box in certain periods and make it safe for use. Store it in a safe and dry place.
Customized:
Well, customized casual archery targets make the suitability for everyone and everyday use. You can use raw materials into the box or cloth or even fill it with soil. So, the target is well customized.
Type-1.2: Haybale archery Target
Hay bale archery target can be one of the smart choices to start practicing. The procedure of making this archery is quite simple and easy for everyone. You need to collect the hay bales near your place or can buy them online. Nothing complicated to need, just use a piece of paper with a manual draw or use your actual target as well. By the way, we’re pleased with using it at this price. But everything has its degraded point, we’ll discuss it in the disadvantage section.
Is hay bale for archery target any good?
Of course, if you look at its specification and suitability, you can’t deny its advantages. Weather compressing the hay creates its compact flexibility to catch the arrow from a definite place. But the thickness of hay and weight must be considered.
Instruments you need?
- Hay bale block
- Piece of paper (for targeting)
- Stripe (For clipping onto hay)
How to make hay bale archery targets? ( Step )
Collect the hay bale from the local market, if you can. The price is not too much. A 20 to 25 buck is enough to buy it. Then the next task is to set it up in a flat place. A backyard can be a convenient choice to step up for practicing.
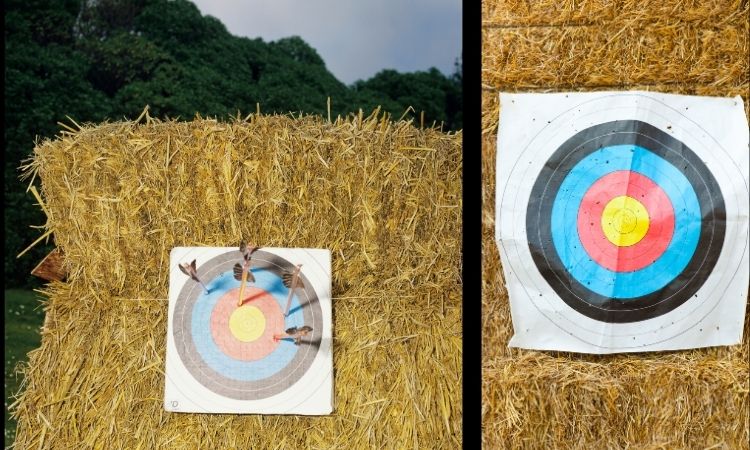
If you are using a minimum 2ft height of hay block, don’t need any support to keep straight in position. But if you want to make the archery target longer than 2ft then try to make a support stick beside both parts of the hay block. Otherwise, hay bales won’t be flexible to practice.
Now place a piece of paper and start practicing. However, you can also try carpet, soft cloth or anything like that.
Advantage:
- Easy to assemble and make
- No need for any external manforce and workforce.
- Provide a quick start.
- Relatively cheap
- Provided backstops. ( for board hay bale area)
Disadvantage:
- Less longevity
- Maintenance
- Rain and weather problematic
- Insects and bugs attractive.
How to use a hay archery target?
Just a quick two-step formula. Place the hay pallets onto the position and set the targeting block or even possible with only hay bales. But you can try the target materials.
Make a distance and start the practicing session. Different heights are not constant for different angles. You have to manage it.
Accha! Do you like it?
#2 Top casual Terms!
Portability
Oh, sorry. It’s quite difficult to transfer the hay block from one place to another place. Because the hay bale and straw make its position and day by day the fiber is getting stocks and difficult or boring to transfer to another place.
Balance
Yes, when you use the hay target, it feels like you are balanced and suitable for use. Especially if you are living in that hay productive area, must have it.
Type-1.3: Coiled straw archery target
Coil straw archery target is basically upgraded from hay bales or like straw and fiber which keep into a roll and make a round shape for flexible structure and suitable archer pointer.
Generally, most of the time professionals use this archery target for practices and during matches. Those come from professionally and commercially but you can also make one at home with minimum actual knowledge.
Is coiled straw archery target safe?
Yes, why not? It’s safe. First of all, these are made from hay or straw fiber so they could bare narrow easily. And eventually, make the perfect choice for working with it
How to make a straw target?
1. First collect the straw or hay fiber from the local market or buy from online. Dry it, if the straw is wet.
2. After consequently drying up the fiber make a roll with your hand. This could be a tricky part but if you try you will succeed.
3 .Make a role according to the diameter you want. During starting to make the rolling you will understand the diameter you need and make that length of the rolling straw.
4. Now use cardboard and set the straw roll round wise (Fibonacci pattern) and clip it with each other. Boom you just made a straw rolling archery target.

Advantage:
- Professional looking
- Long term use.
- Round shape
- Portable
Disadvantage:
- Hard to make
- Slight expensive
- Water sophisticated
Durable:
The cold straw archery targets are durable and convenient to use. If you want to taste a new experience to make a new type of rolling and round archery target, this could be one top choice. Try it!
Category-2: Regular free archery target
From this archery target section, you need a small number of things that can manage around or from the neighbor. However what the tools and product needs are generally unable in daily use. Here are the type-
Type-2.4: Vertical Multiple partition cardboard
From cardboard to make an archery target is most usable and most made simple making procedure nowadays. Because all families having decent quality cardboard here and there or every product packaging comes with these cardboard. Just pick a medium to large size cardboard board for making the procedure.
The double partition cardboard archery target is simple but if you do so this will be pretty interesting and surprising with a new horizon of an interventional target to family. We’re sure your family members obviously appreciate the making procedure of this multiple cardboard partition target.
Are the multiple cardboard effects well?
Yes, we can say. If you are experienced to make several targets or want to try something new this can be your top choice on the list. Moreover, the multiple mechanisms are new, and damn sure you try this one. The procedure takes a little bit of time but the final things will definitely seek your attention.
Instruments you need!
- Need Several cardboard sheets
- Glue gun or paper glue
- Raw paper (For the filling)
- Measuring scale
- Marker
How to make a DIY cardboard archery target?
Step-1: Collect all cardboard sheets and make the same size at least 12 inches square or 1 sq/ft. If you want to increase the diameter, just collect the broad diameter cardboard and set it up.
Step-2: Collect at least 10/11 cardboard sheets. First place on the ground and markup the area with a measuring scale.
Step-3: Now use the glue gun or paper glue onto the straight markup line and set the one after one cardboard. The setting of cardboard must be at least 5 layers horizontally and keep a distance from each other with 1 inch.

Step-4: Now cover the around of the layering box with another cardboard sheet. Now it’s ready to use and start practicing.
Advantage:
- No cost
- Clean
- No maintenance need
- Easy to use
- Don’t require any essential tools
Disadvantage:
- Can’t left outside
- Water contact makes useless
- Slight hard to make
- Quick spoilers.
How to operate it? Any tricky way?
The multiple layer cardboard archery targets are like other targets that you usually use for daily practice. First, place it in a definite place. Especially for this target you must need a backstop or need a clean and crowd less backyard. You can also set at the table and start practicing. We’re telling you the exact truth, however, the procedure can give a new experience to make a target.
#2 Top casual Terms!
Efficiency:
Honesty can provide you nothing but entertainment for a moment, this is high for those people who want to reveal new experience and are passionate about archery target making jobs. The target provides you less efficient and is finished quickly but after regular follow up, it can be still playable.
Portable?
Yes. Thus this is made of a simple cardboard sheet from several slices of cardboard. So this is so lightweight and can be transferable from one place to another. We think it will be good for those little families to have kids and go on tour. Easy portability and lightweight structure and using different colors look lucrative to children.
Type-2.5: Horizontal partition cardboard target. (Effective one)
We have discussed the vertical partition target from the type-3. But the horizontal partition cardboard target is obviously for those who are almost beginners to the profession. You can use the professional bow, crossbow, regular bow, recurve bow, or even hand made bow. All sorts of bow and archery will suit these positions of cardboard target systems.
The horizontal partition makes it a compressed cardboard archery target and super friendly for any kind of archery. The procedure is easy, but we say it’s super easy and so simple to make and ready for practitioners and effective also from any kind of target. As well as the expense is low near no investment.
Why is this homemade archery target cardboard so effective?
Imagine if you make a fellow product of a house to a lucrative archery target. What will it look like?
Amazing! Because the target is as effective as the brand product. The work capability, efficiency, and reusability make it so effective for daily use. So why would you miss it? Just follow the instructions and make one for practice.
Instruments you need?
- Just a decent amount of cardboard.
- A rope for tying
- Supports
How to make a horizontal partition cardboard target? A quick start guide!
Horizontal means the cardboard takes parallel in position and remains horizontal. As like that when several layers of cardboard positioning with each other the structure is tight enough for pointing archery.
1. First collect the cardboard. The cardboard must be at least 2ft in length and 1ft in width. We Have made one with this measurement and it works well.
2. Then start positioning the cardboard one upon one and press a little bit so that the board couldn’t move. For this preparation, you need 50/ to 60 sheets and even after that, the main structure is revealed to you.
3. The next step is to tie up the full structure so that the board remains close together. Use a thick nylon rope or something like a rope to tie them.
4. Now check the cardboard position in line and check the tightness of the rope. Sometimes the rope can cause a low compactness problem.
Advantage :
- Easy to make and professional looking.
- Don, not any hard work
- No extra tools needed
- Easy and comfortable structure
Disadvantage:
- Less longevity
- Water droplet can damage the target
- Regular follow-up is needed.
How to use these targets?
The general purpose of the use of this archery target is to practice and make the arrow throwing capability next level. As like others you can use all kinds of bow and archery for targeting and easy homemade cardboard archery targets fulfill the practical show in real life. Treat it like a regular archery target and get more advantage from it.
#1 Top Casual Terms!
Productivity
The cardboard made archery targets are made for a decent period and thus the way the productive formation gets. If you take the product with good customization this could be the foremost option to build one.
Category-3: Without invest archery target
When you badly need an archery target for yourself or your kids, there is not much time to think about it. At that moment the without invest archery target that refers without cost or home materials made archery target can be the top choice. Here is the example-
Type-3.6: Free cardboard archery target.
Free cardboard archery targets are easy to make and easy to use. This is not for long-time practice but if you have less time to make one then you should try this. With the free cardboard method, the archery target will be easy to make and able to play instances.
Instruments you need!
Rectangle-shaped cardboard (Generally you will find it in the storeroom, we are damn sure), Duck tape, Marker pen, Raw writing paper or newspaper.
Step-1: First choose the rectangle-shaped cardboard box and look back if there are any dents of crack on there.
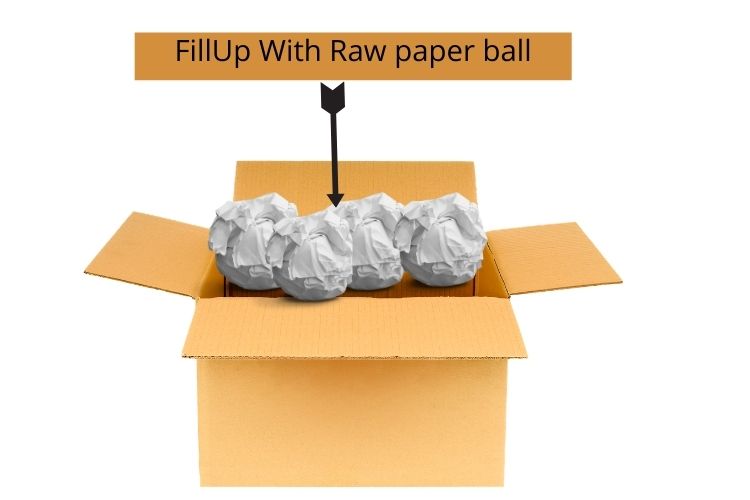
Step-2: If everything is okay, then fill up the cardboard box with raw newspaper or writing paper with round scrapping.
Step-3: Tie the cardboard box with a rope, but if you use a duck tape it will be better to wrap-up and next start practicing more and more.
Advantage:
- Instantly ready
- Easy to use
- Not expanse
Disadvantage:
- Not long last
- Water droplet will harm
- Quickly scattered down
How to use the free cardboard archery target?
As with other archery targets, you need to place it in the higher place and the tie enough so that it won’t displace its position. Then use it as a regular target. You can use several pieces of cardboard for long time practice.
Type-3.7: Clay bagging archery target.
Clay is the finest structure of the soil. If you can find the clay soil it will be great for making a clay bagging target. But you can make it with general soil. The procedure is super easy. But you should keep in mind that the split soil must be wet or well hydrated.
Instruments you need!
- Empty corn sack bag or jute bag to conserve the soil,
- Tieng the bag with rope or nylon stripe.
Procedure:
First, make sure the picked soil is solid and wet. Otherwise, when the archery hits the target the dry clay will fall out from the target that’s why we are using wet soil.
After filling the soil wrap up the clay with a corn sack jute bag and then the second wrap with an ethylene bag. And finally, make sure to tie up those two joints with nylon rope. Boom the archery target is ready to use and ready for daily practicing.
Advantage:
- Long time use.
- Customize option and size.
- No need for any extra effort.
Disadvantage:
- The arrow must go through with decent velocity.
- The target width must be regulated or according to the size of the arrow.
How to use the clay bagging archery target.

If the size of the target is large and broad, then the target can be placed upon the soil level. But if you want to practice with support, you can also choose. Both options are open for you
Related: How to Make PVC Recurve Bow?.
Category-4: Expensive archery target
An archery target that is slightly pricey and you have to invest some bucks to make the target. However, the archery target main equipment like foam, carpet, or puzzle mat is quite expensive and the target will last for the next several years. That’s the advantage of expensive archery targets.
Type-4.8: Foam archery target.
Generally, the foam as like dock foam, shipping warehouse foam what comes with something with shipment is used to make the foam archery target which is durable and solid structure makes the device super perfect for targeting archery.
Instruments you need to make?
- Plunk of Foam
- Wrapping elements
- Rope or duck tape
Steps:
- First, choose the foam which is used to make the target. There are several types of foam but dock foam is versatile. So you can choose dock foam.
- Then you can cut the standard square shape so that when you wrap it will help you to the proper structure.
- Wrap it with plastic sheets, cloths, or even thick polythene paper.
- Whether using the tape or rope, the structure will become more tight and hard enough to play for a long time.
- Place the target onto the backstops
- Let’s start play.
Advantage :
- For long term use.
- Simple making procedure.
- Versatile use.
- Supportive options
Disadvantage:
- Need to collect foam.
- Slightly expensive.
#2 source of using compatibility
Productivity:
The device is easy to use and much more convenient for a longer period of use. However, you can learn the target with it much frequently. Just look back at the making procedure and then use it for next time.
Longevity:
The target that derives from foam that will long last than any other archery target. Most using commercial and practicing archery target is foam archery target and the longevity depends on the frequent use of the target.
Type 4.9: Carpet archery target
The procedure is another important archery making target. For this method, you have to collect some partitions of carpet and then need to apply for archery targets. The simple procedure is given below:
Instruments you need?
- Carpet
- Carpet supporting stand
- Tying components like nylon rope
How to make an archery target out of carpet?
1. First choose the carpet for making the layer for the target. For making archery targets you don’t need good quality or plastic carpet. You have to need a clothy or degraded carpet for making the target.
2. For layering, you need extra carpet. If the carpet is 0.5 or 1 inch wide then it will be the best form of use for archery making.
3. Take a stand that can be made with a wooden structure. Place the carpet upon carpet until the minimum width of the target. Minimum 1 or 2 feet is recommended for layering.
4.place on the supporting stand and tie with something.
Advantage:
- Long term use
- As like professional feel
- Not need backstops
- Customize height management
Disadvantage:
- Expensive to collect carpet.
How to use the carpet archery target?
After making the archery target. You have to place it at a definite distance. If you practice hunting with archery you can insert the target in different places and different heights. But if you want to play archery then try to maintain the formula and rules for archery.
Balance:
The carpet archery target is well balanced and the longevity is really good. The target is super user friendly to play both recurve, compound bow and suitable for children to adult.
Type-4.10: Puzzle mat archery target:
Puzzle mat archery target is another sort of playing archery. The Making procedure is so simple and is like a carpet archery target. For this method, you need to replace the carpet with a puzzle mat. And the full procedure is the same.
You have to follow the same step and the using possibility is suitable for both children to adults and able to play with compound, recurve, or PVC making a bow.
The advantage of using the puzzle mat archery target is really simple and long-lasting. You can use the target for several years and use the target for all sorts of practicing and playing games with family.

Conclusion:
These are the different procedures for making archery targets. Different archery targets are made for family fun and for practicing purposes. However, children to adults of all kinds of ages can play with the archery target that is shown in this article. Just follow the making procedure and have fun.
Related Article
- How to Make PVC Recurve Bow? (Try This 2 Way)
- Amazing History of archery || Why would you like Archery?

General Manager & Auditorial Head.
Killian Jake is a World Sports Traveler and hobbyist sports lover. By exploring different sorts of playing modules like indoor, outdoor, and many more. As for professionalism and writing, it’s helpful to give you the right suggestions on different games and sports.
")


