

To make an arrow in the forest, gather thin, straight branches and tie them together tightly with a strong cord. Then, attach a sharp pointed object to the end of the arrow for hunting or target practice.
In the forest, creating your own arrow can be a valuable skill.
Whether you’re an experienced hunter or just enjoy the challenge of archery, making arrows from natural materials can be both rewarding and practical.
By following a few simple steps, you can fashion your own arrows using materials found in the forest.
This not only allows you to connect with nature but also gives you a sense of self-reliance and resourcefulness.
We will guide you through the process of making a functional and effective arrow using materials gathered from the forest floor.
What You Need To Get Started
Selecting The Right Materials
To make an arrow in the forest, you’ll need to gather specific materials that are essential for creating a functional and sturdy arrow. Here’s what you need to get started:
- Wood for the arrow shaft: Look for straight and sturdy wood branches, preferably 30-32 inches long and with a diameter of about 3/8 inch. Common trees to source wood from include oak, ash, and hickory.
- Feathers for fletching: Gather feathers from birds such as turkeys or pheasants. You’ll need three feathers per arrow. Make sure the feathers are intact and free from damage.
- Sinew or artificial sinew: Sinew is a strong and flexible tendon found in animal muscles. Alternatively, you can use artificial sinew made from synthetic materials. Sinew is used to attach the arrowhead and fletching to the shaft.
- Arrowheads: Choose a suitable arrowhead for your intended use, such as broadheads for hunting or target points for practice. You can purchase arrowheads or craft your own using materials like stone, metal, or flint.
- Glue or adhesive: A reliable adhesive is necessary for securing the arrowhead and fletching to the shaft. Choose a strong and durable glue that can withstand the force and impact of shooting.
- Sandpaper or a knife: A smooth arrow shaft is crucial for accuracy when shooting. Use sandpaper or a knife to remove any roughness from the wood and create a polished finish.
Tools And Equipment Required
To craft an arrow in the forest, you’ll need certain tools and equipment to ensure precision and efficiency. Here are the essential items you’ll need:
- Knife: A sharp and sturdy knife is essential for cutting branches, shaping the arrowhead, and performing various other tasks during the arrow-making process. Choose a knife that is suitable for outdoor use.
- Saw: A small saw is handy for cutting larger branches into smaller, more manageable lengths for arrow shafts.
- Needle or awl: A needle or awl is useful for making holes in the arrow shaft to attach the sinew or artificial sinew.
- Sandpaper or file: Use sandpaper or a file to smooth out rough surfaces and create a polished finish on the arrow shaft.
- Heat source: If you plan to craft your arrowhead by melting metal, you’ll need a heat source such as a forge or campfire.
- Pliers or multitool: Pliers or a multitool can come in handy for various tasks, such as bending and shaping metal arrowheads, making adjustments, or tightening and securing components.
These materials and tools are essential for crafting your own arrow in the forest. Gather them before embarking on this exciting project, ensuring you have everything needed to create a functional and reliable arrow for your outdoor adventures.
Understanding The Anatomy Of An Arrow
When it comes to making arrows in the forest, it’s important to have a good understanding of the various components that make up an arrow.
Each part plays a crucial role in its performance and accuracy. In this section, we’ll explore the different components of an arrow and their functions.
Arrow Components And Their Functions:
- Shaft:
- The shaft is the main body of the arrow, typically made of durable materials such as wood, carbon, or aluminum. It provides the backbone and stability to the arrow during flight.
- It needs to be sturdy enough to withstand the pressure exerted by the bow while maintaining flexibility for optimal accuracy.
- Fletching:
- Fletching refers to the feathers or synthetic vanes attached to the rear of the arrow. Generally, three fletchings are positioned at equal angles around the shaft.
- Fletchings stabilize the arrow mid-flight, ensuring proper spin and trajectory control.
- They create drag, enabling the arrow to maintain a stable flight path.
- Nock:
- The nock is a small groove or plastic insert at the end of the arrow shaft. It is designed to fit on the bowstring.
- Its primary function is to hold the arrow securely in place, allowing for consistent and proper alignment.
- It also aids in ensuring uniform release and accurate arrow flight.
- Point:
- The point, also known as the arrowhead, is the front end of the arrow designed to penetrate the target.
- Different types of points are available for various purposes, such as target shooting, hunting, or practice.
- Common point materials include steel, aluminum, or even stone, depending on the desired use.
Choosing The Right Spine And Weight:
- Spine:
- The spine of the arrow refers to its stiffness or flexibility. It determines how the arrow reacts when shot from the bow.
- Choosing the right spine is critical to achieve consistent arrow flight and accuracy.
- Factors like draw weight, arrow length, and the type of bow used influence the appropriate spine for an arrow.
- Weight:
- Arrow weight plays a crucial role in determining its speed, trajectory, and accuracy.
- Depending on the activity, such as hunting or target shooting, the weight of the arrow should be chosen accordingly.
- Lighter arrows travel faster but may sacrifice some kinetic energy, while heavier arrows offer better penetration but can be slower.
By understanding the anatomy of an arrow, including its components and considerations like spine and weight, you can make informed decisions when crafting or selecting arrows for your forest adventures. Experimentation and practice will help you find the perfect combination to enhance your shooting skills.
Preparing Your Materials For Arrow Making
To create a successful arrow in the forest, you need to start by preparing your materials.
This includes straightening wooden shafts and processing feathers for fletching. Let’s dive deeper into each step:
Straightening Wooden Shafts:
- Inspect the wooden shafts for any bends or twists.
- If you find any irregularities, gently heat the shaft over a flame or boil it in water to make it more flexible.
- Apply pressure and carefully straighten the shaft using your hands or a straightening tool.
- Ensure the shaft is straight from end to end to optimize arrow flight.
Processing Feathers For Fletching:
- Collect feathers from birds that have molted or from a reputable source.
- Carefully remove any excess fat or flesh from the feathers.
- Trim the feathers to the desired length for fletching using sharp scissors.
- Align the feather quill with the arrow shaft, ensuring it is centered.
- Secure the feather to the shaft using thin thread or glue, allowing it to dry completely.
Remember, the quality of your materials and their preparation will greatly impact the performance of your arrows. With straightened wooden shafts and properly processed feathers for fletching, you’ll be on your way to crafting arrows that hit the mark in the forest.
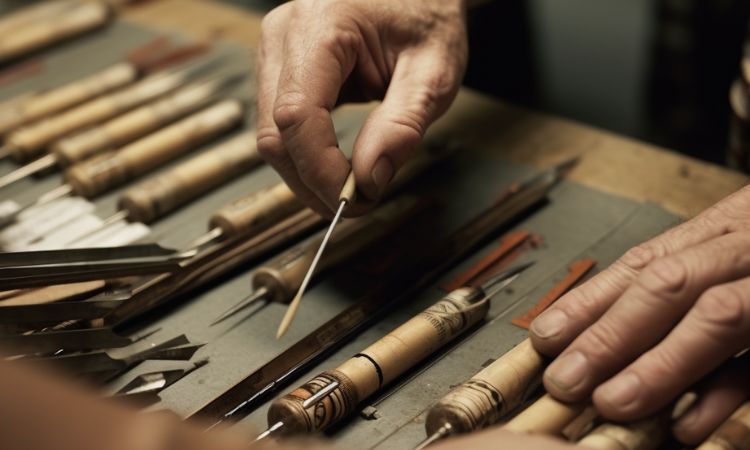
Crafting Your Arrowhead
Crafting your arrowhead is a crucial step in making arrows for hunting or target practice. The arrowhead is the sharp tip of the arrow that pierces through the air and hits the target.
Depending on your needs and preferences, you can choose from different types of arrowheads.
In this section, we will explore the different types of arrowheads and their uses, followed by a step-by-step guide to making a stone arrowhead.
Different Types Of Arrowheads And Their Uses
- Broadheads: These arrowheads have wide blades and are commonly used for hunting larger game animals. They deliver a deadly impact and create large wounds, ensuring a quick kill. Broadheads can be fixed or expandable, with the expandable ones opening upon impact to increase the cutting surface area.
- Bullet points:
- Target points: These arrowheads are specially designed for target shooting. They have a conical shape and are made of durable materials like steel or tungsten. Target points are ideal for practice and precision shooting, allowing arrows to penetrate the target with ease and accuracy.
- Blunt points: Blunt points are used for small game hunting or practice shooting. They have a flat, rounded tip instead of a sharp point, which reduces the risk of penetrating too deeply into the target. Blunt points are suitable for hunting small animals without causing excessive damage to the meat.
Step-By-Step Guide To Making A Stone Arrowhead
- Gather the necessary materials:
- Flat stone or flint: Choose a stone that is suitable for shaping into an arrowhead. Flint is a popular choice due to its sharpness and durability.
- Safety goggles: Protect your eyes from any flying stone particles during the crafting process.
- Leather pad or gloves: Provide a cushioned surface to place the stone on while working on it.
- Prepare the stone:
- Place the stone on the leather pad or wear protective gloves to hold it securely.
- Identify the part of the stone that will become the arrowhead and mark it with a pencil or marker.
- Shape the arrowhead:
- Use a specialized tool like an antler tine or pressure flaker to chip away small flakes from the stone. Start with the edges and gradually work towards the center.
- Aim for a triangular or leaf-like shape, creating sharp edges that taper down to a point. This shape ensures effective penetration and cutting ability.
- Thin the arrowhead:
- Use the pressure flaker or a small abrader to remove excess thickness from the arrowhead. Thin it gradually to achieve the desired sharpness and slim profile.
- Sharpen the arrowhead:
- Use a grinding stone or sandpaper to refine the edges of the arrowhead. Work carefully to create a fine and sharp point.
- Finishing touches:
- Smooth out any rough surfaces or imperfections on the arrowhead using sandpaper or a fine-grit stone.
- Test the arrowhead:
- Attach the arrowhead to a shaft using twine or glue. Ensure it is securely fastened.
- Test the arrowhead’s effectiveness by shooting it into a target or a soft material like cardboard.
Remember, crafting a stone arrowhead requires patience and practice. Take your time to perfect your techniques and create arrowheads that suit your hunting or shooting needs.

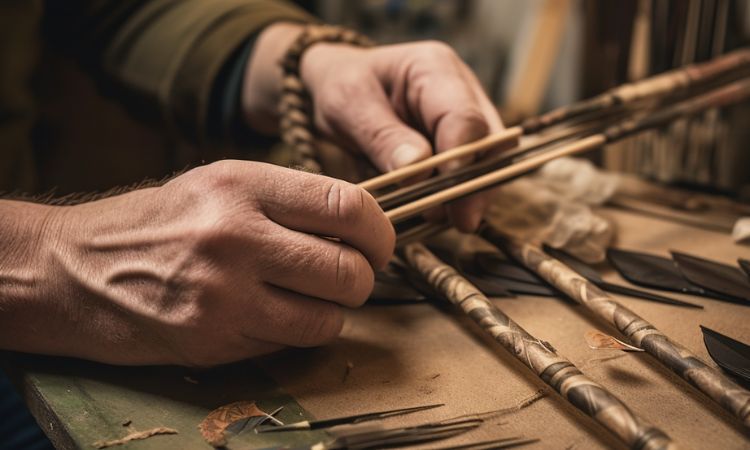
Fletching Your Arrows
Choosing The Right Feathers For Stability And Accuracy:
When it comes to fletching your arrows, choosing the right feathers is crucial for ensuring stability and accuracy in your shots. Here are some key points to consider:
- Use feathers from the wings of large birds such as turkeys or geese. These feathers are sturdy and durable, providing excellent stability for your arrows.
- Opt for natural feathers rather than synthetic ones. Natural feathers have been used in arrow fletching for centuries and offer better flight characteristics.
- Select feathers with consistent shape and size. This will help maintain balance and symmetry in your arrows, resulting in more accurate shots.
- Check the color of the feathers. Brightly colored feathers can help you easily track your arrows during flight and retrieval.
- Consider the length of the feathers. Longer feathers typically provide more stability, while shorter feathers offer increased maneuverability.
Putting On Fletchings:
Fletchings, also known as vanes, are the small pieces attached to the rear end of arrows. They play a crucial role in stabilizing arrows during flight.
Here’s a step-by-step guide to putting on fletchings:
- Begin by cleaning the arrow shaft of any dirt or debris. This will ensure that the fletchings adhere properly.
- Apply a thin layer of glue or adhesive to the base of the fletching. Ensure that it covers the entire surface area.
- Position the fletching at a 90-degree angle to the arrow shaft, with the front edge slightly overlapping the arrow nock.
- Press the fletching firmly onto the arrow shaft, applying even pressure to ensure a secure bond.
- Repeat the process for the remaining fletchings, evenly spacing them around the arrow shaft.
- Allow the glue to dry completely before using the arrows.
Feather Placement Techniques:
Proper feather placement is essential for achieving optimal arrow flight. Here are some techniques to consider:
- Helical placement: This involves attaching the fletchings in a helical pattern around the arrow shaft. The angled placement creates a spiral effect, increasing stability and reducing arrow wobble.
- Straight placement: In straight fletching, the feathers are attached parallel to the arrow shaft. This technique offers minimal drag and is suitable for faster arrows.
- Offset placement: With offset fletching, the feathers are attached at a slight angle to the arrow shaft. This helps counteract the spin of the arrow, resulting in improved accuracy.
Remember, experimentation is key to finding the feather placement technique that works best for you. By adjusting the angle and spacing of your fletchings, you can fine-tune your arrows for optimal stability and accuracy.
Attaching The Arrowhead
When it comes to making an arrow in the forest, attaching the arrowhead is a crucial step that requires precision and proper technique.
In this section, we will explore different adhesive options for securing the arrowhead and discuss wrapping techniques for added strength.
So, let’s dive right in and discover these essential aspects of arrow-making.
Adhesive Options For Securing The Arrowhead
- Epoxy: Epoxy is a strong adhesive often used in arrow making due to its excellent bonding capabilities. Simply mix the epoxy components together and apply it to the base of the arrowhead. Allow it to dry according to the manufacturer’s instructions for a secure attachment.
- Hide glue: Hide glue, derived from animal collagen, has been used for centuries in arrow making. Heat the hide glue, apply it to the arrowhead, and press firmly to ensure proper adhesion. As the glue cools, it solidifies, securing the arrowhead in place.
- Cyanoacrylate glue: Also known as super glue, cyanoacrylate glue is a quick and easy option for attaching arrowheads. Apply a small amount to the base of the arrowhead and hold it firmly against the shaft for a few seconds. The glue sets rapidly, creating a strong bond.
Now that we’ve covered the adhesive options, let’s move on to explore different wrapping techniques that can provide additional strength to your arrow.
Wrapping Techniques For Added Strength
- Sinew wrapping: Using strong and flexible animal sinew, wrap it tightly around the base of the arrowhead and along the shaft. The sinew should be moistened before wrapping to promote better adhesion. As it dries, it contracts, providing a strong and secure attachment.
- Thread wrapping: Thread wrapping involves using a durable thread, such as linen or synthetic materials, to secure the arrowhead to the shaft. Begin by tying a knot at the base of the arrowhead and then wrap the thread tightly in a spiral motion. Finish by tying another knot to secure it in place.
- Decorative wrapping: In addition to enhancing strength, decorative wrapping adds aesthetic value to your arrow. Use colorful threads or other materials to wrap the arrowhead base and shaft creatively. While this technique may not provide as much strength as sinew or thread wrapping, it offers a visually pleasing touch.
Attaching the arrowhead is a critical step in arrow-making. Selecting the right adhesive and employing appropriate wrapping techniques will ensure a secure and robust arrowhead attachment. Experiment with different options to find the best combination that suits your needs.
Now that you understand these aspects, you are ready to take another step closer to completing your forest-made arrow.

Nock Installation And Point Attachment
Forest survival skills require knowledge and expertise in crafting your own equipment. If you find yourself in need of a reliable and effective hunting tool, making an arrow in the forest can be a valuable skill to possess.
In this section, we will guide you through the process of installing the nock on the shaft and properly attaching the point, ensuring your arrow is ready for action.
Installing The Nock On The Shaft:
To create a functional arrow, the first step is to secure the nock onto the shaft. The nock serves as a connector between the arrow and the bowstring, enabling an accurate release. Follow these steps for installing the nock:
- Choose a suitable nock that fits the size and type of arrow shaft you are using.
- Place the nock onto the end of the arrow shaft, ensuring it aligns with the natural direction of the feathers or fletchings.
- Apply a small amount of glue or adhesive to secure the nock in place, ensuring it is firmly attached.
- Allow sufficient time for the glue to dry and set before proceeding to the next step.
Proper attachment of the point:
Attaching the point to your arrow is crucial for maximizing its effectiveness. Here’s how you can ensure a proper attachment:
- Select a suitable arrowhead or point, considering your specific hunting needs and the type of game you intend to target.
- Double-check the diameter of the arrow shaft and choose a point that corresponds to it.
- Apply a small amount of glue or adhesive to the base of the point, ensuring a secure bond with the arrow shaft.
- Carefully align the point with the tip of the arrow, ensuring it is centered and parallel to the shaft.
- Firmly press the point into place, making sure it is securely attached.
By following these steps, you can install the nock on the shaft and attach the point properly, creating a functional arrow for your forest adventures. Remember to exercise caution and practice your skills before relying on your handmade arrows for hunting.
Happy crafting!
Testing And Fine-Tuning Your Arrows
Once you have crafted your arrows, it’s time to put them to the test. Carefully examining their spine and weight consistency is crucial for optimal performance.
Additionally, you’ll need to make adjustments to ensure that the arrows fly perfectly. Here’s how you can test and fine-tune your arrows for improved accuracy:
Checking Arrow Spine And Weight Consistency:
- Spin test: Hold the arrow by the nock and spin it vertically. Observe if it spins uniformly or wobbles. A consistent spin indicates good spine alignment. If it wobbles, it may suggest a spine inconsistency that needs adjustment.
- Weight check: Weigh each arrow individually using a precise scale. Ensure that all arrows intended for the same bow have identical weights. A slight variation in weight can affect accuracy and flight trajectory.
Adjusting Arrows For Optimal Flight:
- Nock fit: Verify that the arrow nocks fit securely on the bowstring. If they are too loose or too tight, it can affect arrow flight. Use a nocking pliers to adjust the tension accordingly.
- Point alignment: Ensure that the arrowhead aligns perfectly with the shaft. Misaligned points can lead to unpredictable flight patterns. Adjust the alignment by gently rotating the point until it aligns with the shaft.
- Fletching inspection: Examine the fletchings for any damage or misalignment. Damaged fletchings can cause the arrow to veer off course. Replace any damaged feathers or vanes, and ensure they are securely attached to the shaft.
- Arrow length: Check that all arrows are the appropriate length for your draw length. Arrows that are too long or too short can affect both accuracy and the bow’s performance. Resize the arrows if needed.
- Stabilizer adjustments: Fine-tune the stabilizer to ensure the arrow balance and flight stability. Gradually adjust the position and weight of the stabilizer until you achieve the desired arrow stability.
By carefully testing and fine-tuning your arrows, you can significantly enhance their performance on the field. Consistent spine and weight, along with optimal adjustments, will ensure accurate flight and maximize your shooting proficiency. Remember to take your time during this process to achieve the best results.
Maintaining And Caring For Your Arrows
Taking proper care of your arrows is essential to ensure their longevity and optimal performance. Here are some tips on cleaning, storing, and repairing your arrows:
- Cleaning your arrows: Regularly clean your arrows to remove dirt, debris, and moisture that can accumulate during use. Use a soft cloth or brush to gently wipe down the shaft and fletching. If necessary, you can dampen the cloth slightly with water or rubbing alcohol to remove stubborn stains. Always avoid using harsh chemicals that could damage the arrow’s surface.
- Storing your arrows: Proper storage is crucial to preserve the quality and durability of your arrows. Consider the following guidelines:
- Store your arrows in a cool, dry place to prevent them from warping or developing mold.
- Use a dedicated arrow storage container or quiver to keep them organized and protected.
- Avoid exposing your arrows to extreme temperatures or direct sunlight for prolonged periods as this can weaken the materials.
- Repairing damaged arrows: Accidents happen, and arrows can sometimes get damaged. Instead of discarding them, try to repair them using these methods:
- Replacing broken nocks: If a nock gets damaged or breaks, carefully remove it and replace it with a new one. Make sure the replacement nock matches the size and type of the original.
- Fixing loose or damaged fletching: If the fletching becomes loose or torn, you can secure it back in place using fletching glue. Remove any loose fletching, apply a small amount of glue to the damaged area, and firmly press the fletching back onto the arrow shaft.
- Straightening bent arrows: If an arrow becomes bent, you can attempt to straighten it using gentle pressure. Start by grasping the arrow near the bend and slowly apply pressure while rolling it back and forth. Be cautious not to exert too much force, as excessive bending can weaken or break the arrow.
Remember, proper maintenance and care will extend the lifespan of your arrows, ensuring they remain reliable and accurate.
Make it a habit to clean your arrows after each use, store them appropriately, and promptly address any damages to keep them in top shape for your next adventure.
Frequently Asked Questions For How To Make Arrow In The Forest
How Can I Make An Arrow In The Forest?
To make an arrow in the forest, you will need a straight stick or branch, feathers for fletching, a sharp knife to carve the arrowhead, and strong cord or sinew to attach the fletching.
Carve the arrowhead to a point, attach the feathers with cord, and your forest arrow is ready!
What Materials Do I Need To Make A Forest Arrow?
To make a forest arrow, you will need a straight stick or branch as the arrow shaft, feathers for fletching, a sharp knife for carving the arrowhead, and strong cord or sinew to attach the fletching. These materials will help you create a functional and effective arrow in the forest.
Can I Use Any Type Of Feathers For Arrow Fletching In The Forest?
While you can use different types of feathers for arrow fletching in the forest, it is best to use feathers from birds like wild turkeys or pheasants.
These feathers are sturdy, have good natural curvature, and can provide optimal stability and accuracy to your forest arrow.
What Is The Purpose Of Fletching On A Forest Arrow?
The fletching on a forest arrow has two main purposes. Firstly, it stabilizes the arrow during flight, ensuring accuracy and minimizing wobbling.
Secondly, it helps the arrow spin in flight, improving its penetration and overall effectiveness when hunting or target shooting in the forest.
How Long Should My Forest Arrow Be?
The length of your forest arrow depends on your personal preference and how you plan to use it. As a general guideline, the arrow length should be around twice your draw length for optimal performance.
However, it’s always best to test different lengths and find the one that feels most comfortable and accurate for you.
Conclusion
Creating arrows in the forest can be a rewarding and useful skill to have. By following the steps outlined in this blog post, you can learn how to craft your own arrows using materials readily available in nature.
From choosing the right wood for your arrow shafts to shaping and fletching them with feathers or other materials, each step is crucial in achieving arrow accuracy and effectiveness.
Remember to practice patience and precision throughout the process, as rushing can lead to subpar results.
Whether you are an archery enthusiast, a survivalist, or simply enjoy connecting with nature, making arrows in the forest is a valuable skill to acquire.
By mastering this craft, you can enhance your outdoor experiences and feel a sense of accomplishment knowing you crafted your own reliable and functional arrows.
So, head out into the forest, gather your materials, and start your arrow-making adventure today!

General Manager & Auditorial Head.
Killian Jake is a World Sports Traveler and hobbyist sports lover. By exploring different sorts of playing modules like indoor, outdoor, and many more. As for professionalism and writing, it’s helpful to give you the right suggestions on different games and sports.
")
")

